Saturday, June 28, 2008

Sock tutorial part 3

OK, I know a lot of you are ready for part 3 so here it is. The short row heel. First, check out this link, it is a lot better than I could do: Silver's Sock Class She does a fantastic pictoral tutorial on short row heels. I'll go thru step by step too, but she's got great pictures on how to wrap and turn. :-) Thanks Judy for passing that link along to me!

OK, to begin with, your sock should look like this before you start the heel:


it should reach the front of the ankle comfortably without much stretching. Now you begin the short rows. Begin with the first sock, letting the other one just hang out on the cables. Knit across to the last stitch, wrap the last stitch by bringing the yarn to the front, slipping the stitch purwise to the right needle, bring the yarn to the back again (wrapping around the front of the stitch) and slip the stitch back to the left hand needle. It is now wrapped. turn the work so you are facing the purl side of the stitches. Using the same needles and working the same sock, purl across to the last stitch and wrap that one by bringing the yarn to the knit side, slip the stitch, bring the yarn back to the purl side and slip it again. As I said, there are great photos on the website I linked to above, if my directions confuse you at all.

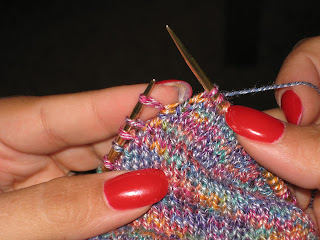
A wrapped stitch. The orange yarn is wrapping the pink stitch on the left hand needle.


How to tell which stitch should be next: the stitches that are already wrapped are spaced apart. The next stitch to be wrapped is close together with the last stitch wrapped (the 2 pink ones on the left needle). You can also look at the base of the stitches and see which ones already have the small loop around them.

Continue this way. My sock has 30 stitches on each side, so 30 heel and 30 instep stitches. Therefore my short-rowing is:

k 29, wrap next stitch and turn
p 28, wrap and turn
k 27 wrap and turn,
p 26, wrap and turn.
k 25, wrap and turn
p 24 wrap and turn

and on and on. I like to have my heels resemble the toes, so I stop the short rowing when I have the same number between wrapped stitches as I have on the cast on. For me, I stopped after I did the p 10, wrap and turn row. It now looked like this:


Now for increasing back up, making the heel have that nice pocket in it. My next row was:

k 10, slip the next stitch and pick up the wrap below it, slip the stitch back to the left and knit the wrap and stitch together just like a k2tog. Wrap the next stitch and turn (it now had 2 wraps on it) The next row was p 11, slip the stitch and pick up the wrap, slip stitch back and p2tog purling the wrap and stitch together. Wrap and turn next stitch. Next row was k 12, slip the stitch and pick up the TWO wraps (there will now be 2 wraps on every stitch) and k 2 together, wrap next stitch and turn.


Slipping the stitch to expose the wrap


putting the wraps on the left needle before slipping the stitch back to k the 3 of them together


From there I did p13, p next stitch and wraps together, wrap next stitch and turn
k 14, k wraps and stitch together, wrap and turn
p 15, p next stitch and wraps together, wrap and turn
k 16. . . . and on and on
this is a photo of the corner of the heel halfway thru the increases, you can see the line of picking up wraps and how the pocket is being formed.


I ended up with p 29, p wraps and stitch together, then I turned and knit across all 30 stitches before moving to the second heel.


sock one heel is done, sock 2 heel is ready to begin. You do sock 2 EXACTLY like sock one. You will end it the same way also, knitting across all stitches, and you will once again be ready to work in the round, joining the instep and heel stitches together.


the shape of the heel is very similar to the toe.


Holding it up to make sure it fits my heel.

Now you will turn the work to the instep stitches, once both heels are done, and re-join the two. However, you will notice there is a gap between the 2 because of the short row heels:


Rather than have a hole, I pick up a stitch and k it together with the first stitch like so:

the gap between instep and heel


Put the right needle under a stitch somewhere in the middle, making sure that there won't be a big gap where you pick up the stitch. It doesn't REALLY matter where exactly as no one is going to look that closely. Just somewhere in the middle.


Wrap the yarn around your right needle as if to knit and pull it thru the space you've chosen for your extra stitch. Place this stitch on your left needle.


K the extra stitch together with the first stitch on the left needle.

Repeat this on sock 2, and again on the other side so you have this done 2 times on each sock, once on each side.

I am planning to do ribbing on the leg of my sock because it is turning out a bit looser than I'd like. I should have done a few less stitches but oh well. The foot is comfortable, but if I don't do ribbing on the leg it will not stay up :-) So, I did a few more rounds to make sure it is tightened up around the ankle and high enough for the ribbing to be comfy, and next will come the leg.

I am planning to do a 2x2 rib, which means on the one side it will begin and end with a purl stitch. If your row ends with a purl stitch MAKE SURE YOU BRING THE YARN TO THE BACK AS IF TO KNIT before starting the second sock, otherwise your yarn will be on the wrong side of the cables when you go to start the other row of the sock. Just try to mentally remind yourself to switch the yarn to the back after every row end so that it is in the correct position and you should be fine.

For those of you who like to jump ahead of the class, here's what you do next. Knit the leg however you want (ribbing, stockinette, even lace or cables for those of you who want to be adventurous!) to however long you want it (make sure you try it on because it may look longer on the needles than it does on your leg!). If you're doing stockinette or lace or even a wide rib, I reccomend doing about an inch of ribbing along the top of your sock to hold it in place. 1x1 or 2x2 ribbing work the best. Then bind off VERY loosely, I'd reccomend using a needle a few sizes bigger for the bind off. What you do for bind off (and don't worry, I'll take photos when I get to this point and post them), you rib across the first sock then begin bind off on the second sock, switching to the back needle when you get there. For example, you begin the bind off on the heel side of sock 2, turning to the instep side when you reach that point. The bound off stitches are on a separate needle a couple sizes bigger. once sock one is bound off, begin binding off sock 2, you can begin the bind off on the instep side and end on the heel side--one extra half round (ROW) won't matter, trust me. This way you aren't having to put half a sock on hold in order to move to the next sock, or worrying about stitch holders etc. This may be confusing for beginners, so if it is put the sock aside and wait a bit, I'll put photos up in a few days when my sock gets to that point! :-)

Good luck and PLEASE let me know if you have any questions. Email me at iffer@AOL.com or leave me a comment here and I will do my best to help you. Have fun knitting! And when you're done with your socks PLEASE PLEASE PLEASE send me a photo and a "supply list" (yarn used, needle size) and I will put a photo of your socks up on my blog with your name, so everyone can be proud of your accomplishment! Everyone who sends me photos will be included, so please share!


Wednesday, June 25, 2008

craft room done!

Ahhhhhh my craft room is finally done! The house is coming along great, almost unpacked (oops, found a couple boxes last night with more yarn and stuff in them, shhhhh!) and getting it decorated and homey. I feel so much better now that I can come relax in my craft room!! Anyway, here's some photos I know a lot of you have been asking for! :-)


The front flower garden. It is growing in nicely!

the view from our side yard. There's 2 or 3 houses nearing completion but to our knowledge only one has been sold. So far there's only us and our next door neighbors in the whole sub divison!


Hubby's office. I just had to show this so you can see how different his tastes and mine are! On his other wall he has a bright red shelf, and his desk is white. Very modern. Yuck. :-)

My fireplace. the words are hard to read on the mantle but it says "Family" then I have a willow tree figurine of a mom and daughter on one side and a father and son on the other. The candleholder thing was a hobby lobby find at half off! I love a good sale!


the house, and the grass is finally growing in! Hubby had to actually mow last weekend, he was thrilled. Now if only the back yard would grow in. . .


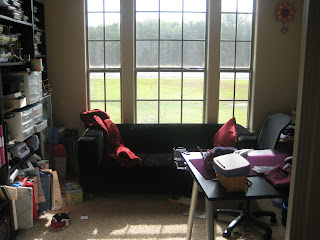
looking into my craft room. The light in the morning isn't very good b/c the sun rises in the front so it is super bright. I need to get curtains. But you can see my couch with a red throw blanket and pillow. They will be replaced with knit items when I get a chance. I have plans for a lighthouse intarsia pillow and a leftover sock yarn throw.


the corner next to my couch, printer and file cabinet with all my stampin' up! cardstock and 3 drawers (2 are inside the large drawer so they can be locked I guess) I keep all my knitting notions and stamping necessities in the drawers.


my very full shelves. Stampin supplies, scrapbook stuff, more stamping stuff, cross stitch misc, books and magazines galore, stuff to stamp ON, etc. I have a lot of crap LOL.

the view from my couch. Looks out into the kitchen and dining area so when the kids are eating lunch I can be in here and still see them. :-)


My yarn closet. I still have more that was hiding in the garage. Some is charity yarn from Alice, I have the knit picks pallette sampler from my mom for Christmas, and I tried to keep it all separated by weight and stuff. I need to put a lock on it to keep hubby out, he doens't need to see how much yarn I have LOL.


My favorite item in the whole room, my shelf. I painted it and added rub ons to make it pretty. On top from left to right: my decorative birdhouse I made, a willow tree figurine of a pregnant woman I got at my baby shower, my vase with my bamboo needles, my clear glass vase with other misc. needles and balls of yarn for decoration, my mug with crochet hooks and dpns, a stamped little butterfly poem/decoration and my face vase I made in high school.

slightly better shot of the rub-ons, stampin' up ones. Green and white flowers and vines.

my computer desk. You can see the hanks of yarn I got for my readers wrap. I'm loving it. So pretty. reminds me of the carribean or something, blues and greens and purples.

OK, so that's my craft room. so, what have I been working on? Well, I have about 7 or 8 inches (out of EIGHTY!) done on mom's wrap, a bobble pattern that is working up very nicely in yarn bee chenille, I'm to the heel portion of my tutorial socks (more on that later), a few rows away from the heel on a pair that I guess I'm giving to my grandma-in-law, since they don't fit anyone else LOL (I used the wrong needles and they are too small). Good news on those is that Nana doesn't like tall socks, she likes really short ones, so they should be finished very soon. I've got plans for my reader's wrap that I may wait until mom's wrap is done to do, a pair of socks for my son and maybe one for my daughter when I'm done, a crochet toilet paper holder for our master bathroom (I think I need more yarn for it though), a couple baby hats for a lady once she pays me, and then stuff for the craft bazaar that my friend Dawn and I are doing this December. My mom and I have done it the last few years but due to her health she can't so Dawn is joining me. It is going to be FUN!

OK, off to knit while my daughter is napping. If you're ever in the area and want to come hang out and knit in my craft room, give me a holler! :-D


Tuesday, June 17, 2008

sock tutorial part 2!

OK, you've done the cast on and set up. (BTW, if you're still having trouble with the cast on, go to http://www.youtube.com/ and search for magic cast on. There's several videos there. Warning, the cat Bhordi one is really long, but it is good. )


OK, so now you're ready to start back on needle #1. Turn the work so that needle 1 is in front and the working yarn is hanging on the left. Slide the needle so that the stitches for row 1 are resting on the left tip, and the other tip is in your right hand, ready to knit. The stitches for row 2 should be resting on the cable for needle 2.


Now begins the increases for the toe. The increases are a 2 round repeat, as follows:


Round 1: (both rows), k into the front and back of first stitch (from now on referred to as kfb), k to last 2 sts, kfb, k1. Repeat for second sock and for row 2 of both socks.


Round 2: k across.


How to tell if you're coming to an increase round--this particular increase makes the new stitch look like a purl stitch. if the second stitch looks like a purl stitch, you are NOT on an increase round. If the purl stitch is a row down, it is time to increase again. In this photo you can see the horizontal lines on the right hand side, a couple of stitches in. Those are the increases. See how they are spaced a couple rows apart? That is how it should look in case you set the socks down and forget if you were on an increase row or not. :-) I've made that mistake before!


Now you just keep increasing until you have 60 stitches for a medium women's foot. This is just a guideline, if you have wider or more narrow feet, are making these socks for a guy in your life or are using different yarn/needle sizes, you can change this number. The great part about this method is you can TRY THE SOCKS ON AS YOU GO! :-D Isn't that great?!? So try 'em on, see if they are wide enough for your (or the recipient's) foot, and when they are you can stop increasing. The toe should be about 2" long. And I made a mistake yesterday, which I will go back and fix, but the cast on should be about 1.5 inches, not 2. Sorry! If it is wider, it isn't a big deal. some people actually prefer it that way :-)

so just keep doing the 2 rounds until your sock is as wide as your foot. It should look like this:

Next step for my socks is just plain stockinette stitch the whole length of the foot. I haven't gotten there yet so I don't have photos or a measurement, but I will soon :-) If you're more adventurous, you can add ribbing or lace with whatever pattern works for half your stitches, or one row. Typically you don't add ribbing or lace or anything to the bottom of a sock. But hey, it is your sock, so do whatever you want! For this tutorial though I'm going with simple. So after you have the toes done, just keep knitting without increasing until the socks reach the front of your ankle. I will take photos of what I mean as soon as I get to that point.

Good luck and let me know if you have any problems!!

Monday, June 16, 2008

tutorial--2 at a time toe-up socks on 2 circular needles! Part 1

OK, I know a LOT of knitters who want to learn this method. I am not, by any means, an expert, but this is my favorite method for making socks and I have done several pairs this way, so I'm going to create this tutorial to help any and all of you knitters wanting to learn. If you have ANY questions or my directions aren't clear, please leave a comment or email me at iffer@AOL.com. I'll be happy to help you!


OK, here we go! Are you ready?


The socks I'm making for this are with sock weight yarn and size 2 needles. However, if you would prefer using thicker yarn and bigger needles, or even smaller needles for that matter, this pattern is easily customizable. Don't worry, I will walk you thru it all.


This method is NOT HARD. It is a bit complicated and may seem fiddly at first, but once you get the hang of it and the lightbulb goes off over your head, you'll wonder why you ever tried dpn's or one at a time socks :-)


To begin, (deep breath if need be!!) please read and review this cast on method.
http://www.knitty.com/ISSUEspring06/FEATmagiccaston.html I will do my best to explain it, but they have great photos and instructions there.


Pick your two needles. I am using two size 2 circs, both 24", one is an addi lace and one is an addi turbo lace. not a ton of difference, other than color and a slightly sharper tip (FWIW, I much prefer my knit picks needles over the addis, but these worked better for pictures since they are different colors.)


Now for the cast on. Hold the two needles together, one tip (needle #2) in back and one (needle #1) in front. For me the gold one is needle #1, silver is needle #2. Make a slip knot and put it on needle #2. The points should be held in your right hand with the tips pointed to the left, if you are right handed. If you're a lefty, I have no idea. :-) Sorry! Hold the tails of your yarn like you would for a long tail cast on, with the tail end over your thumb and the working yarn over your forefinger. You have one stitch (the slip knot) on needle #2, to make a stitch on needle #1 you bring the working yarn on your forefinger under both needles and around the top of needle #1, in between the 2 needles. To make the second stitch on needle #2, you take the tail end on your thumb, bring it under both needles and around the top of needle #2, in between the 2 needles. Repeat these steps unti you have 10 sts on each needle. (for better instructions click the link above) If you are using different weight yarn or different needles you can change this number. Just make sure it is an even #, and that the total cast on measures about 1.5" long give or take a bit. Socks are not an exact science, despite what many think. :-) Relax, it is just knitting LOL


now tie a small knot with the tails to hold it together, to the inside of the sock (the side with what looks like purl bumps). You can tie a lose knot if you want to undo it later before you weave in the ends.


now slide the stitches down both needles, onto the cables.


Cast on for the second sock the exact same way starting to the left of the first sock. when done, all the tails should appear on the left. Make sure you are using the second ball of yarn for the second sock. :-)

Congratulations, you have casted on!! Before we get to knitting, I want to explain the difference between ROWS and ROUNDS as it pertains to this method. Each ROUND has 2 ROWS. A ROW is one half the stitches on each sock. A round is, well, a complete round of each sock. For instance, ROW one is on needle #1, ROW two is on needle #2. Once you knit both rows you have completed a ROUND. Clear as mud? OK, lets move on. Remember this tip as you may see it again!


OK, on to knitting your first round. For ROW 1, (see, told you that you'd see it again!) you will just knit as normal. For ROW 2 you will be knitting thru the back loops in order to twist the stitches in the proper direction. It's easy though, don't worry.


First, let's turn the whole kit 'n caboodle so that the tails are all on the right, and needle #1 is in front. now pull the tip of needle #1 so that the stitches for row one are resting on the tip, while the stitches for row 2 are still hanging on the cable of needle #2.


Pull the tip of needle #1 up to begin knitting. when you knit, the purl bumps will be on the inside of the sock. Make sure you have the correct needle tips before you begin knitting, as I said it helps to have 2 different needles so you can see at a glance that you're always using the correct ones. In this case, both the tips of needle #1 are gold.


Knit across the stitches for sock #1, row #1. now slide those stitches down before beginning the sts for sock #2.


be sure to drop the yarn for sock #1 and pick up the yarn for sock #2!! Trust me, you don't want to forget to do that! :-)


now begin knitting row 1 on sock #2. sock #1 is just hanging out on the cable.


knit across the stitches for sock #2. When done with this it will look like so:


You have now done your first row! OK, slide needle #1 to the left so that all the stitches are resting on the cables again. Turn the work. (when turning, you may want to periodically check to make sure that the 2 balls of yarn aren't tangled.) Now you're ready to begin the second half of the round. Do this the same way you did row #1,

except knit thru the back loops of the stitches. This is the ONLY time you will do this on these socks.


Knit thru the back loops across both socks, stopping sock one and starting sock 2 just like before.

You are now done with the cast on and set up!! Tired yet? I promise this is the most complicated part. Well, except for the heel, but that isn't too bad either, really! I will post the toe increases and foot soon, once you've had time to digest all of this. Please let me know if you have any questions or if I can help you!! Good luck and happy knitting.

Sorry so long!

Sorry it has been so long since I posted! I've heard from a few of you wondering what happened to me LOL. Well, this is why it has been so long:


Our new house!! It looks better now, this was taken about a month ago. we have grass and a flowerbed and stuff now, but I keep forgetting to take photos during the day! Oops. I will soon. Anyway, moving and unpacking has kept me pretty busy.


See what I mean?? This has kept me REALLY busy. This eventually will be my craft room. Although my yarn does not fit, and rather than buy (and put together) ANOTHER bookshelf, I took over the linen closet in the hallway for yarn. The kids sheets can go in their closets and there is a large cabinet in their bathroom for towels. :-)


Yeah, I still have way too many boxes to unpack. I am beginning to seriously worry it won't all fit. What is a knitter/stamper/scrapbooker/cross-stitcher/painter supposed to do with all this stuff?!?! I can't get rid of it, what if I need it for something!?!?! Plus every time I think the kids are playing nicely and I start unpacking, either my daughter flushes a whole roll of toilet paper, at once, in their toilet causing an inch of standing water on the floor (Thank God it is a one story and there is tile!!), or my son takes her doll stroller away which apparently is cause for her to scream bloody murder, or the dog needs to go out which means walking her across the street because dainty princess Rosie won't walk her golden paws on mud. At this rate I will never be unpacked! But at least I have my PC, most of my yarn, and a good amount of my knitting needles. :-) The important things anyway.

So what am I working on? a pair of self-striping socks with a neat little stitch pattern that were going to be for myself but are working up too narrow for my big ole feet. My MIL has narrow feet though, and so does her mom, so MIL said one of them would take them. That makes it easier on me too b/c her feet are shorter than mine and she likes a really short sock, so only have to do about an inch more on the foot, the heel, and will probably go right into the cuff. Easy peasy! I'm also working on a wrap for my mom, being the lovely wonderful daughter that I am she fell in love with a long cabled wrap that a friend had, it is 30:X 80" and has cables all down the length of it, and is made with chenille. I found a nice cheap chenille at Hobby Lobby that is working up nicely, found some great cable patterns in a library book, and will hopefully have it finished for her before I am a grandmother. I should have time, given the fact that my eldest is 4.5 years old. :-)

The other project I'm working on is a very basic toe up pair, stockinette st all the way. I'm taking photos of every step and will VERY soon start posting them here for all to see. I know several people who want to learn how to do 2 toe up socks on 2 circular needles, and since that is my favorite method I thought I'd try to help. Last time I tried to help I had drank 3 glasses of wine, so I don't think I was much help (it was at a knitting retreat. Ever play a knitting drinking game?!?! I have!!) LOL. This time I'm sober, I promise :-) So look for that post probably by tomorrow! At least the cast on and toe, since that is as far as I am on them. I LOVE the yarn though, it is bamboo by Regia? and OMG it is so bright and pretty. Perfect yarn for plain stockinette socks b/c even without a special stitch pattern they will be beautiful.


Last but not least, Happy Father's Day to all dads and men who are like a dad to someone special. This is my wonderful hubby with our two kiddos. They are lucky to have such a great Daddy! don't they look just like him? especially our son. I call them his clone kids :-)

Good night for now!